
Presented are tips and techniques for underwater panorama creation, adding signature lines to your panoramas, and getting your images to de-warp correctly. Issues and examples relating to the number of exposures required for a panorama as well as the panorama size and quality settings are discussed along with a multinode project run through with examples of the results.
- Nodal Point Defined
- Panorama Creation Without a Tripod
- Underwater Panorama Creation
- Image Quality
- Number of Images Required - Image Overlap
- Subjective vs. Objective Panoramas
- Panorama De-warp Correctness Test
- Adding a Signature Line to Your Panorama
- Project Run through - Bear Harbor at Sinkyone Park
Nodal Point - the Optical
Center of the Lens
Before we go any further in this section, we must understand the term "lens nodal point". This is a somewhat confusing term which we will attempt to define by way of physical demonstration rather than through an optics lesson or mathematical equations.
We have been told that the camera must be positioned and rotate over the optical center, or nodal point, of the camera's lens. If we do not do this, our panoramas will look like horrid and we will be witness to the end of the world as we know it. The basic idea is to prevent image parallax between near and far objects which will ruin an otherwise good panorama. For an example of image parallax, perform the following experiment: With one eye closed, hold your hand at arms length with your thumb pointing upward. Position your arm so that your thumb is between your eye and the vertical portion of a door frame. If you are doing this correctly, your thumb should be obscuring part of the door frame. Now turn your head left and right. Notice how the door frame becomes visible as you move your head a bit left or a bit right? This is an example of image parallax due to the fact that the nodal point of your eye is not over the center of your head rotation. You can do this same experiment with a camera and attached lens. Using a standard 35mm camera, pivot the camera left and right over its tripod mount and you will notice the same effect of the far image becoming visible as you get a bit left or right of where you started. If you pivot the camera at a certain point under the lens, you will notice that the far image remains obscured. This special point of rotation is called the optical center, or nodal point, of the lens. The idea is to mount the camera on the panhead so that the nodal point of the lens sits directly over the rotation axis of the panhead. Now that we have that issue out of the way, we can get into more interesting topics.
Panoramas Without a
Tripod
You hold the camera (in portrait mode) up to eye level with your arms tucked in against your body. The idea is to snap pictures which overlap by about 50% (easy to guess at while looking through the view finder) all the way around for 360 degrees of images. By holding the camera steady, and arms tucked against your body, the images will be fairly consistent. You may want to lean back a little bit while in this position to help put the camera lens above your body rotation. You will need to do an interactive stitch, but the results are not bad. You will probably need to crop the top and bottom of the resulting stitched image to account for inaccuracies while shooting the panorama.
- The following is a closeup example of the raw stitch result showing the inaccuracies introduced when using this technique
- Closeup of Resulting Stitch from Hand Held Photos
- Amount of image inset required to get rid of the stitching errors
-
As an example of how well this technique works, we pulled out some old images from a camping trip in which we hiked a few miles looking for a place called "hell to find lake". We found it and took overlapping photos of it for future reference. Little did we know that a year later we would have the technology to take these pictures and produce this stitched image of the area. As you can see, you do not need to create just panorama movies, you can create super wide images as well.
- Hell To Find Lake in Trinity National Forest
-
As a final example of shooting without a tripod, we will show what you get if you shoot a panorama with a mono-pod. This monopod example was taken at Disneyland without the benefit of any panhead. This was strictly a monopod with a camera attached. The only benefit this method has over the hand held method is that the camera stays at one height and pivots around a consistent center. The overlap was a guess for 50% and the level of the unit was total guess for each shot. We did not use our custom compass/bubble level panning device for this panorama. We did, however, come up with plenty of panhead and leveling ideas while we were shooting this series of panoramas. Our compass/bubble level panning device was one of them.
- 322KB panorama of Tomorrow Land at the Happiest Place On Earth
- For a detailed description on the use of a monopod with QTVR, ckeck out:
- www.OutsideTheLines.com/qtvrmonopod
Underwater
Panoramas
Equipment Preparation, Handling, and
Use
You just got your diver certification, so now you want to take underwater panoramas. What now? First, you need to get yourself some underwater photographic equipment. An example of your basic underwater gear is the following:
- Nikonos V underwater camera body
- Nikonos V 20mm lens (equivalent to a 28mm lens above water)
- Your favorite underwater strobe
- Bracket to hold the camera and strobe as one unit with the camera sitting on an L-bracket to increase the vertical field of view. All bracket hardware should be made of aluminum with stainless steel fasteners.
Now that you have your basic underwater photo gear, you need to become one with the equipment. Get used to taking photos underwater, messing with the strobe, focusing and setting the lens aperture. Learn how to clean the equipment, learn how to ready it for underwater use. Once you are comfortable with the use your equipment, do it some more. Practice, practice, practice.

Now you are ready to put together your underwater panorama gear: your basic tripod, leveler, and panhead. The key to picking gear is ease of use. The equipment must be easy to setup, easy to take your images, and easy to tear down. Easy is the key word here because you are underwater and have other, more important things to think about, such as how much air you have left and making sure your dive buddy is not getting into trouble.
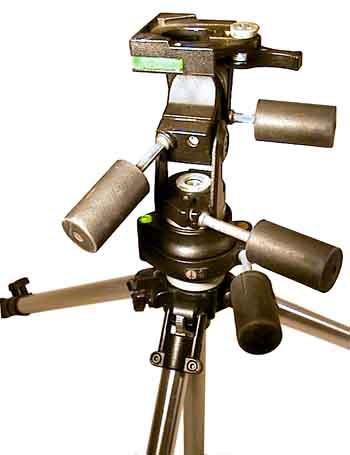
To start with, you need a good solid tripod - sound like a familiar theme? For underwater use, this is more important than ever. You should pick a tripod that is solid and can take a beating. The best underwater tripod is one that can be disassembled and put back together without too much trouble. The Bogen 3001 is a good choice since it is very easy to set up under water and can be cleaned and serviced easily. For underwater use, the rubber leg end caps and the center post end cap should be removed to allow for water drainage and quick air escape. Once you have your tripod picked out, you need to pick out a pan head. We chose to use the standard Bogen 3047 pan/tilt/swivel head for use as our panhead. The setup is simple and our custom compass markings are readable while floating above the equipment. We preset the tilt and swivel portion of the head since below the pan head we use a Bogen 3115 ball camera level. This leveling device is ideal under water as there is only one adjustment. You loosen the ball, level the head, and tighten the leveler down - a process that takes maybe 30 seconds. The last, but most important item, is weight. You will need to add some weight to your tripod setup. Trust us. The weight should be added at the bottom of the tripod legs and is needed to keep the entire setup sitting firmly on the ocean floor, rock steady to keep the influence of the ocean's surge to a minimum. An explanation of creating your own tripod weights can be found on the hardware creation page.
Now that you have your tripod equipment, you need to tear it all apart. Starting with the tripod itself, tear down as much of it as you can. You need to remove all the white lubricating grease you can find. The white grease can not handle the severity of ocean water so you will need to replace it with silicon dive grease. You can get jars of silicon grease at your local dive shop. In addition to the silicon grease, you should get a can of silicon spray while you are there. You should apply the silicon grease liberally to all internal moving parts where you found the white grease. You should then spray the rest of the tripod with the silicon spray. Reassemble the tripod and wipe it down with a cloth to remove most of the excess silicon. You then repeat the process with the ball leveler. Being careful not to scratch either the ball or the socket, put plenty of silicon lube on both the ball and socket. You should then lube all adjustment bolts and threads and spray the rest of the unit. Again, wipe off most of the excess silicon. The next part is a pain, but must be done. You need to completely break down the panhead. If you are using the Bogen #3047 pan/tilt/swivel head, you need to remove the compass marker on the pan section and the swivel marker on the swivel section to get to the retaining bolts. These markers are made of plastic and have sticky backs - you may or may not want to keep them. For our use, we have discarded them since we use our own removable marker plate for the pan marker and the swivel marker is simply not useful for panorama creation. Once you remove all the retaining bolts, the pan/tilt/swivel head should fall apart in your hands. Use the silicon grease liberally on all internal parts, threads, and bushings. Spray the rest of the parts with the silicon spray. Reassemble the unit, being careful of where all of the plastic spacers and bushings belong, and verify you have put it together correctly. Wipe off most of the excess silicon lubricant with a rag. You should then attach the ball leveler to the tripod and the panhead assembly to the ball leveler.
Congratulations, you are now the owner of an underwater capable tripod unit. After an underwater outing, you should wash the unit with warm fresh water to remove all salt and sand contamination, and then make extensive use of the silicon spray. Use the silicon grease for those parts you can get to easily such as the ball and socket of the leveler and all adjustment threads you can get to. A complete tear down and lube session is required every so often; the frequency is up to you.
You should now have two distinct pieces of equipment. The first piece is the camera/strobe combination and should be attached to a common bracket. This bracket will be attached to the second piece of equipment, the tripod/panhead combination. This second piece of equipment consists of the tripod with leg weights, a ball leveler and panhead. Before entering the water, a dry run should be performed.
The camera should be configured with the correct film and lens aperture setting. The strobe should be set for the environment you are going to photograph. These camera settings come from your experience in taking underwater photos. This case is no different.
Next, the tripod is set up and tested. The ball leveler is adjusted to be level. The tilt and swivel adjustments on the panhead are then set so that they are level. The tilt and swivel adjustments need not ever be changed from this position, so they should be locked down tightly. The ball leveler is responsible for leveling the unit and the pan adjustment is responsible for the panorama. Be sure your panning compass marker is attached securely to the panhead. It is no fun to have to guess at 50% image overlap underwater.
There should be a quickrelease at the bottom of the camera/flash unit which mates into the panhead on the tripod unit. For our setup, the panhead uses a large hex quickrelease mount and is suitable for the weight of the camera unit. The camera unit should then be clamped to the panhead to verify all is well with the setup. You should now be ready to carry out the same procedure underwater.
Since both of these groups of equipment are large and unwieldy, each should be carried into the water by different divers. The first diver will bring the tripod group down, open up and tighten the legs, and then level the panhead. Only the top two leg sections of the tripod should be used and the legs should be opened wider than normal. You tend to want the tripod sitting low and squat to avoid being moved by any current or surge. You want it as immovable as possible since you only have one chance to get the panorama. Once the tripod setup is finished, the second diver will verify that the tripod is set up correctly and then attach the camera bracket group to the panhead. The first diver should then verify the camera is setup correctly. All of this is done while hovering above the ocean floor to avoid kicking up dirt and sand. The entire experience is what one might imagine it feeling like to work in outer space, basically setting up a piece of equipment in a weightless environment.
Which brings us to our next important point. The equipment you carry down with you is not buoyant, meaning it sinks, it is very heavy. To achieve a controlled decent, you will need to add a lot of air to your BC (buoyancy compensator). When you place the equipment on the ocean floor and let go, you will rocket to the surface, causing yourself an agonizing death. To solve this problem, you need to let the air out of your BC once you hit the bottom and are ready to let go of the equipment you are holding. Do not forget to do this - you have been warned.
Shooting the underwater panorama
You are now ready to image your panorama. Verify the aperture settings on the lens and set the focus. Verify that your strobe is ready to go. Verify that your dive buddy is out of the camera's view and is going to follow the camera rather than lead it. You should do this since this makes it easy to know if you are in the shot or not. It also keeps the shot free of any kicked up sand and dirt since you are not following their fins. Do not hold onto the camera rig, if you do you will inadvertently cause it to move and require you to start over; be sure to float above it. When you advance the film or rotate the panhead for the next shot, do not hold on to the equipment, exert a downward force to get a sure grip and then make your adjustments.
Once you complete you panorama, go for a swim. Check out the scenery. Have a nice dive. The entire photo process should take no more than 10 to 15 minutes. You should have plenty of air left to cruise around. Don't forget to grab your equipment on the way back.
222KB Example of an underwater panorama taken inside Second Cathedral off of the Hawaiian island of Lanai. The big problem with this panorama is that we had only taken 12 images where 16 or more were needed. Due to the lack of image overlap, the panorama has a great deal of banding because the flash coverage was not great enough to provide balanced lighting. For underwater panoramas, both the lens type and flash coverage will determine the amount of image overlap required.
Image Quality Part
1
As Defined by Download Speed vs. Panorama
Size
- The following example attempts to show the difference in web download speed versus image quality. The idea is not earth shaking, but we felt the need to demonstrate the difference. The idea being that there is a point at which download time outweighs the importance of image quality. That is, there is a point at which the panorama simply takes too long to download and you lose your audience. There is another point in which the image quality is simply too poor and you lose your audience.
- This first panorama is 33% the size of the original at 144KB. Note the quality of the image and the loss of detail when zoomed in.
- This second image is full size at 945KB. Note that in this case the image takes far too long to download, but that the quality is sufficient enough to see the detail of the image.
- This third panorama is 66% the size of the original at 463K. It has sufficient image quality and an acceptable download time compared to the full size panorama.
Image quality Part
2
As Defined by Download Speed vs. Compression
Settings
- The following examples show the effects compression on image quality. The parameter for using the p2mv tool to set the image quality compression settings is the following:
- Image quality of movie (default=1023 (codecMaxQuality))
- -quality <image quality>
- Using the Cinepak compressor, we can adjust the image compression to reduce the image size but at a cost of image quality. By adjusting this setting, as well as the actual pixel size of the panorama (as demonstrated above), you can maximize your panorama acceptability of quality and download speed for web delivery.
- This first example is a 414KB panorama with a maximum quality setting for the Cinepak compressor.
- This second example is a 131KB panorama created with a quality setting of zero (-quality 0).
Number of
Images
Depends on Lens and Lighting
The following image examples show the differences in image quality relating to dark bands produced by extremes in exposure value from one image to the next. Note that as the number of exposures is increased, the banding effect is reduced due to smoother image blending from one to the next. If the camera exposure setting of the entire panorama were consistent or the scene itself had balanced lighting throughout, the banding effect would be reduced. Your images would not require as much overlap, thus reducing the number of images required for your panorama. By increasing the amount of overlap, you can get away with fully automatic camera exposures without significantly increasing the banding effect on the panorama for unbalanced scenes such as the following. We have several wide angle examples from a Canon PowerShot 600 digital camera of image overlap in the case where there is a large exposure difference between frames due to shooting into the sun. We have provided both blended and non blended stitched images to show how the blend command in the stitcher can be used to average out the exposure differences.
- 70% overlap - 24 images for full panorama
- 55% overlap - 16 images for full panorama
- 40% overlap - 12 images for full panorama
- 30% overlap - 10 images for full panorama
- 10% overlap - 8 images for full panorama
Subjective vs.
Objective Part 1
Finding the Forest Among the Trees
- The following is a quick comparison between an image with too much detail "noise" versus the same panorama which has gone through some Photoshop "enhancements". The left hand panorama has a lot of detail, but much of it is just noise; you can't really get a grasp of what the panorama is trying to convey. In the right hand panorama, you get a better idea of the environment you are in although there is much less detail. This is a case of basic information overload which has been attenuated by removing much if the small detail, leaving only the important information for the viewer.
- Two 234KB panoramas of Disneyland's ToonTown
Subjective vs.
Objective Part 2
Panorama with Different Paint
Techniques
- As we have seen with the above panorama, you can enrich a panorama by reinterpreting the panoramic scene using various post processing techniques. In our case, we simply ran the stitched panorama image through a Photoshop filter to reduce the amount of irrelevant detail into something a bit more subjective. In addition to reducing panorama detail, one can also add to the visual richness by other photographic tricks. While your original image may be interesting and true to life, you can spice up your panoramas with a bit of surrealism using this technique. You could reduce the color saturation and adjust the colors for a pastel 50's look, or you could turn your panorama into a duo tone to give the viewer a sense of calm and serenity. The following example is a panorama which has been changed to a contrast enhanced duotone image.
- 635KB panorama of Emigrant Wilderness overlooking Relief Reservoir
- In addition to changing the look of the panorama for artistic reinterpretation, you can also use this technique to mask a camera's poor image quality. The following panorama was taken with a Canon RC-250 video still camera which produces 250 lines of analog video and is of extremely poor quality. The left hand image shows an untouched panorama from this camera. The right hand image is an altered panorama which attempts to give the feel of looking at a panoramic painting.
- Two 246KB panoramas of an outside scene
Circle in
Panorama
De-warp Correctness Test
- To help tune the warp/de-warp parameters of both the stitcher and msnm tools, you can use this little trick. Create a panorama that contains a large circular object that is relatively level with the camera. This can be a large truck tire or wheel, or a round business placard. The idea is to create your panorama with the tool settings you have found to work and tune them by making sure the circular image in the panorama is a true circle. If the stitchers 'fovy' parameter or the msnm vPanRange parameter are sub optimal, you will see an oval rather than a true circular image of your control object. Another method is to take images with 20% overlap, and paint a circle onto the center 20% of one of your images. This leaves 20% on either side of the painted circle for image blending and offset errors when the panorama is stitched. Due to the relatively small size of the painted circle, in addition to its location in the center of the image, it should be close to what one might photograph if the object actually existed.
- Individual frame with circle painted over center 20% of image
- After you have stitched and created a panorama, you should see the painted circle you have added. If all of your parameters are correct, you should have a circle rather than an oval.
- 91KB Panorama built correctly with painted circle
Adding A Signature
Line
- A signature line is a copyright notice, a personal signature, or other important information you may want to attach to your panoramas. In our case, we will detail how we added the following signature to an example panorama:
- ©Concepts In Motion - www.OutsideTheLines.com
-
First, we will share with you some of our original ideas on this and why we decided against them. The easiest way to add a signature is to paste the text into the panorama image somewhere at the bottom of the frame. The resulting signature, when viewed in the panorama movie, is curved, unreadable, and generally unprofessional looking. It does seem to be in a good location otherwise.
- Example of curved text
-
So you figure that the problem is that the text is not curved, so you think about orienting the text vertically. This is not curved, is readable (though sideways), but looks silly and unprofessional.
- Example of vertical text
-
So you try the text oriented vertically but with the text rotated. A bit better, but still does not look any better than previous tries.
- Example of vertical rotated text
-
The only solutions are either not having a signature, or bending the text so that it matches the warped image. We went with the latter technique, dealing with the few issues of warping the text to match the panorama image itself. The amount of warp is dependent on the camera/lens combination you are using. The wider the lens, the more warped the text needs to be to match the panorama image. The other issue is placement of the signature text. If the text is to be placed at the bottom of the frame, the text must be warped upward. If the text is to be placed in the center of the frame, then no warping should be required. For the top of the frame, the text must be warped downward to match the panorama image.
- To resolve these problems, one simply needs to take a partial panorama of an object which will act as a template for the warped text. For example, find a park bench with a horizontal rail upon which you could imagine your signature line placed, similar to where an advertisement might be located. Take a partial panorama, 3 or 4 images, so that you capture the entire template object - the park bench in this case. Make sure the template object is located at the bottom of the panorama, in about the location you want your signature line to sit. Once you create your partial panorama image, you should extract from it just the warped template image upon which you will create your signature. As an example of this, we used the back of a kitchen counter as our template as shown here:
- Extracted template from stitched partial panorama
-
Once you have extracted your template image, you need to import it into a drawing application that allows you to create text along a curved path. In our case, we imported the template image into Adobe Illustrator. From there, we created a text path whose curve and width matched the curve and width of the template.
- We then added our signature text along the path in a font and size that allowed the text to span the entire width of our template. After deleting the template image, we saved the file as our signature text.
- Screen shot of Illustrator canvas with signature text along template path
-
From the signature text we create our signature image as follows. Open the Illustrator file from within Photoshop at the default size suggested in the open dialog - the background for this image should be empty, not filled with any color. We now have some minor preparatory work to complete before we are able to paste this image into our real panorama. First, the canvas (not the image) should be enlarged a bit to give some working room. Next, to bring out the signature within the panorama itself, we created a second layer upon which we airbrushed a light background for the signature text and set this layer to 50% opacity in the layers palette. Once we are happy with the look of the airbrushed background, we merge down layer 2 (the light background) into layer 1 (the text) and save it as our completed signature image. You should merge down layer 2, rather than flatten the image, to preserve the transparent background of your signature image.
- Screen shot of Photoshop canvas with painted background and text
-
At this point, we simply open a panorama image created with the same camera and lens combination as that used for our signature image, rotate the image 90 degrees clockwise, paste the signature image at the bottom of the panorama is some appropriate place, rotate the panorama back 90 degrees counter clockwise, flatten the image, and save the finished panorama as a PICT file. You have now created a professional looking signature line, which when viewed from the panorama movie, will be flat and readable along the bottom of the frame. Be aware that if you intend to reduce the size of your signed panorama image, the signature will become blurred and unreadable. To prevent this, you should recreate your signature image by opening the Illustrator signature text at the reduced percentage you intend on reducing your final panorama image. For example, if you intend to reduce your panorama image by 50% for the final panorama movie, you should first open the signature text at 50% size, create its painted background and paste that entire thing into the 50% reduced panorama image.
- Example of unreadable text as a result of reducing the final stitched panorama image size after the signature text has been added
- Example of readable text as a result of reducing the final stitched panorama image and signature text separately
- Example of correct signature text
- 946KB panorama with the final signature added
Project Run Through -
Bear Harbor at Sinkyone Park
Sinkyone Wilderness - Bear Harbor
Camp
The Bear Harbor QTVR project is an example of why digital cameras with removable storage make a lot of sense. Bear Harbor is a camp located along the California pacific north coast in the Sinkyone Wilderness. We were there for 4 days of basic rest and relaxation, and on the second day we realized we were having warm sunny days with blue skies - a minor miracle for the north coast. With this revelation, we decided to pull out the Canon XapShot video still camera and take a bunch of panoramas. We had enough floppy disk storage and battery power for 40 nodes. We mapped out the camp, the beach, the bluff, and up and down the coast on a Nut'n PAD writing tablet and divided up the different areas with the number of nodes we thought would be appropriate. We started shooting around 11:30 in the morning, shooting from one end of the camp to the beach. We shot the bluff, then shot up and down the coast. Each node took around 90 seconds to set up the tripod, level the head, and take the shots for the panorama. The camera has auto-exposure only metering so we did not have to do anything special here, just point and shoot. We then walked, with camera on the tripod, to the next location. All in all, the complete set of panoramas took a few hours to complete, all in one early afternoon. If the images did not turn out, or if some of the panoramas did not work because we were not very careful about tripod levelness, or whatever, we were only out our time and not a bunch of expensive film and processing costs. We had time, that is why we were there, to enjoy ourselves, and our panorama shooting afternoon was fun, it didn't really matter if the the shots worked or not. As it turns out, the shots did work, quite nicely in fact, even with the ultra poor quality Canon XapShot camera. The image quality is not very good, but gives you the idea of the surrounding area, so much so that you may want to visit the the place. We would not have done this if there was any expense involved. We did this because we were there, had the benefit of good weather, and had a camera with removable storage and lots of reusable media.
3.4MB multinode panorama of Bear Harbor at Sinkyone Park. The Bear Harbor panabout was built using half sized stitched images. The original stitched image size was 2496x320 and produced a 9.2MB multinode panorama. With each stitch reduced to 1248x160, the file size has been reduced to 3.4MB without losing too much in image quality.
Once back at home with 13 floppy disks worth of images, 3 complete panoramas per disk, it was time to do the actual work. We used a PowerMac 8500 to record in millions of colors at 320x240 the NTSC images from the video out port of the XapShot camera. Image folders corresponding to the floppy disks were created and numbered according to the disk number itself. All images were saved into their respective folder, each folder containing the images needed for 3 panoramas. The following is the folder hierarchy for the Bear Harbor multi-node QTVR project. The thing to take note of is the naming scheme used for the files. In order for the Scene Editor to work correctly, all node names are required to have indexes of increasing magnitude. For this reason, we split the node sections into different numerical ranges. For example, the Beach section contains all the 100 series nodes, and the Bluff section contains all the 400 series nodes.
Home - www.OutsideTheLines.com
Questions or comments about this site should be directed to:
SiteGuy@OutsideTheLines.com