

In addition to a computer, QuickTime VR authoring software, and a camera with an appropriate lens for the look you want (wide or flat), what else do you need to produce QTVR content? There are several levels of need which blur together to form a continuum. The following examples attempt to show both extremes and the middle of the road equipment used to create panoramas.
- For a detailed description on the use of a monopod with QTVR, ckeck out:
- www.OutsideTheLines.com/qtvrmonopod
The lowest range of
hardware acquisition
Nothing. Yes, that is correct, you need nothing more than a camera to take QTVR panoramas. You hold the camera (in portrait mode) up to eye level with your arms tucked in against your body. The idea is to snap pictures which overlap by about 50% (easy to guess at while looking through the view finder) all the way around for 360 degrees of images. By holding the camera steady, and arms tucked against your body, the images will be fairly consistent. You may want to lean back a little bit while in this position to help put the camera lens above your body rotation. Once you take your pictures, get them into the computer in some fashion (PhotoCD, scan the images or negatives, or use a digital camera). You will need to do an interactive stitch, but the results are not bad. You will probably need to crop the top and bottom of the resulting stitched image to account for inaccuracies while shooting the panorama. This technique is a good way to get a partial panorama or just a super wide photograph, and is good for those cases when you do not have all of your QTVR geek gear. An example of shooting by hand can be found on the Tips and Techniques page.
The middle range of
hardware acquisition
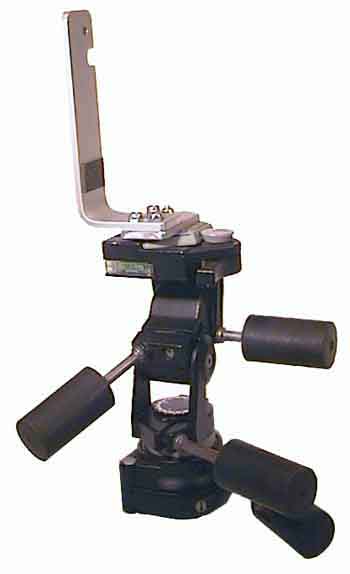
A decent tripod should be on your list. The weight of the camera to be used and type of use in the field should help you determine the best tripod for your needs. In our case, we found a used Bogen (Manfrotto) #3001 medium duty tripod with a Bogen #3047 pan/tilt/swivel head (panhead). The cost was around $80 USD for the tripod and head. We then attached a new Bogen #3115 (Manfrotto #138) 3-inch ball camera leveler ($60 USD) under the panhead. The ball leveler is used to level the rig and the panhead is used to pan the camera to get a 360 degree panorama. You could forgo the ball leveler and level the panhead by adjusting the tripod legs - you will only do this once, maybe. The other solution for leveling is to add a second panhead in place of the ball leveler. We like the ball camera leveler solution as there is only one adjustment and it does not add significantly to the height of the rig. We chose this route for our basic tripod set-up as it is solid, simple, and would work well for our underwater needs. Be sure the tripod, leveling head, and panhead are sturdy enough to handle the torque created by the weight of the camera rotating off center of the panhead rotation axis. Remember, the lens nodal point sits at the center of panhead rotation, not the camera. As you rotate around to capture your panorama, be sure the camera stays square and level with the rotation axis of the panhead. The bottom line is to get a good, solid tripod to support the camera rig you place on top of it. A poor quality tripod setup will most likely result in poor quality panoramas.
Note that we do not use a fancy click-stop panhead. We found we could get consistently excellent results with the standard panhead of the tripod with a ball leveler head sitting below to level the entire rig. We use the standard compass marker on the panhead for panning demarcations when we shoot our panoramas. The Bogen #3047 panhead has 24 demarcations for panning which works out great for 35mm lenses on land and 20mm lenses underwater when you use a strobe. We have created additional demarcation plates which sit on top of the default marker with 24 (12 if you use every other mark) and 16 demarcaions for the different lenses we use. From our experience, it is not too much trouble to accurately line up the camera with the panning demarcations as any error is fixed up in the stitcher with its "range" parameter to help find the correct image overlap. Other folks have also found that the click-stop mechanisms are not needed by everybody. Kaidan (http://www.kaidan.com) has a product called the KiWi™ (http://www.kaidan.com/kiwi.html) which is simply a pan only head with a built-in L-bracket that works for most camera/lens configurations. The Kaidan KiWi™ is avaialble for around $100 USD.
Once you get your tripod and panhead story figured out, you need some way to mount the camera in a vertical fashion to the pan head. You can mount your camera horizontally and create excellent panoramas, but mounting it vertically will get you a greater vertical field of view. To mount your camera vertically, we recommend building a custon L-bracket as the cost and labor is minimal. When making the L-bracket you need to be sure the nodal point of your camera lens sits over the rotation point of your panhead. Here are some simplified instructions: cut the bar stock into a 4" length, mount the quick release plate to it, cut another piece and put a 90 degree bend in it, bolt this one to the first. Mount the camera to the vertical side of the bent piece and you are done. All said and done, We spent about $200 USD for the entire setup. It is simple, works well under water, and is indestructible. A step-by-step example of building your own L-bracket and pan-markers can be found on the Photographic Accessories creation page. If building your own is too much trouble, you can buy adjustable L-brackets (with left-right and front-back adjustments) from your local pro-camera shop. Be sure there is enough play to adjust the lens over the panhead rotaion.
- We found a Bogen tripod (#3001) w/head (#3047) for $80 USD (used)
- A Bogen ball camera leveler (#3115) which sits under the panhead for $60 USD (new)
- A home made L-bracket made from 1/4" x 1" x 5' aluminum bar stock purchased at your nearest hardware store at $5 USD for a length much longer than you need
- A Bogen hex plate quick release mount for the L-bracket $7 USD (new)
You have now become a semi pro QTVR equipment owner. You have your basic tripod, leveling panhead, and camera mounting L-bracket. You are now ready to join the world of QTVR photographers. The hard part now is learning to make good use of your equipment. Simply owning the equipment does not make you an expert, so now you practice, practice, practice. Have fun, go create kool panoramas!
After hauling a heavy tripod rig around for a while you may consider graduating to a monopod. These are extremely lightweight, set up extremely fast, and do not draw much attention.
Monopod first pass: A step backward
Since we are not using a panhead, you need to rotate the pod itself and use the viewfinder to guess at 50% overlap. This is pretty easy since 50% is a simple overlap to be consistent with as long as you pay attention to the images you are taking photos of. Herein lies the next problem. While you are busy looking through the viewfinder to compose the next image, it is very hard to look at a bubble level to help prevent wobble between shots, hence the guess work. This technique is possible, however, and you end up with a slightly better version of the technique of holding the camera to your eye with your arms tucked in against your body. We clearly would like a panhead of some kind to help with leveling and image demarcation for consistent image overlap. With the amount of guess work involved in overlapping the images, you will probably need to do an interactive stitch to help the stitcher do its job. An example of shooting a panorama with a monopod can be found on the Tips and Techniques page.
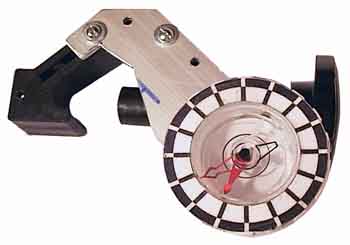
Monopod second pass: Two steps forward
What of the panhead you ask? There is a simple solution to this: Make use of the Earthly environment we live in - use a combination of a compass and a bubble level. Rather than the degree markers on a standard compass, place image demarcations around the edge for the number of images you need. Place a bubble level below (or on top of - whatever works best) the compass and attach this unit to the side of the monopod. For each image, make sure the bubble is centered and the compass needle points to a demarcation line on the edge and snap an image. You then rotate the pod so that the compass needle points to the next mark, level the bubble and snap the next image. This gets you in and out quickly without hauling around a bunch of equipment. A step-by-step example of building your own monopod pan head can be found on the Photographic Accessories creation page.
- A Bogen monopod (#3006) for $38 USD (new)
- A Bogen hex-quickmount head for $17 USD (new)
- L-bracket from tripod setup
- Lighting accessory clamp for $10 USD (new)
- Mountaineering compass for $18 USD (new)
- Bubble level for $2 USD) (new)
The highest range of
hardware acquisition
You have now decided that QTVR content creation is your calling and you intend to make a career of it. You are probably already a professional photographer and would like to augment your business with QTVR and want the highest quality and most versatile QTVR creation equipment you can find. You are probably interested in doing both outside and inside panoramas, and will probably create panoramas in a studio atmosphere. For this work you will probably be using only the highest quality cameras and lenses, using both digital and traditional imaging and you want a set up that can handle this versatility. You will probably demand the highest exactness of camera, panning, level, and nodal point settings. For this type of situation we recommend using a heavy duty Kaidan click-stop pan head and camera L-bracket. You will want a quality, heavy duty, tripod that will not bow or rock as you image your panorama. A tripod dolly may also be required to enable ease in location changes. In addition to the camera tripod environment, you will need the traditional support equipment used in professional photography such as lights, reflectors, gels, backdrops, cables, sandbags, support crew, etc.
Home - www.OutsideTheLines.com
Questions or comments about this site should be directed to:
SiteGuy@OutsideTheLines.com